Monday, April 30, 2012

I'm just back from CK Manchester and had an absolute blast.  Not only did I get to spend the weekend with my close friend, Dawn, but I also got to spend some time with other friends that I don't see nearly as frequently as I would like.

I took two classes: a mixed media album class taught by Sophia Trujillo of Strictly Scrapbooking and a clear acrylic tri-fold frame class taught by Clear Scraps.  I left each class with a beautiful finished project.

Now for the shopping - ouch!  I spent a small fortune to the tune of 4 figures.  Oh yes I did ... and you know I do not feel the least bit guilty and there's no Monday morning buyer's remorse.  All in all, the weekend was mega fun and very relaxing.  Well, relaxing, maybe that's not the right word, but it was a wonderful change from my every day routine and I enjoyed myself thoroughly.

And, as an added bonus, I met Sophia, Sharon and Laurie all from Strictly Scrapbooking.  Dawn and I helped them breakdown after the Convention and let me tell you that is hard work.  I definitely respect all that goes into making that happen.   One of my jobs was taking inventory of Bo Bunny and Hot Off the Press products.  I literally got to fondle hundreds of sheets of paper!  Ahhhhhhh ... the beauty of it all!

I will add photos of the completed projects tomorrow.  But for now, it's back to that routine I mentioned.


Pin It!

Thursday, April 26, 2012

New sketches are up at Twisted!  Check 'em out - some cute stuff there.  www.twistedsketches.org

Here's my slightly out of focus layout.  One of these days I'm going to learn how to use my camera!  Honestly, I am.

The photo is Avery Grace.  Tell me that smile doesn't melt your heart!


Pin It!

Monday, April 23, 2012

It's Monday and once again the weekend got away from me.  I had a great weekend, but didn't get everything done that I had hoped to.  One thing I did do, that has been on my 'to do' list for a couple of years now, was to go to Southwick's, an awesome zoo in Mendon, MA.  I had a great day there with Anna and Mic and managed to get some decent pictures.  Here's one of my favs.


I loved the "Woodland Forest" - an area where you are allowed to walk freely among the deer.  I have always loved deer.  They are such peaceful animals.  I saw several all white deer, something I've never seen before.


And beautiful parrots.


They also have a program where you can feed the giraffes.  That activity doesn't begin until May, and at only certain times of the day.  Anna has been wanting to feed the giraffes for a few years now but has never managed to be there at the right time.  Folks are chosen on a first come basis.  Knowing Anna and Mic, I'm positive they'll do it eventually.


And, on Sunday Eligio and I went to see the documentary "Chimpanzees" a great film about the habits of chimpanzees.  If you get a chance, it's definitely worth catching it at your local theatre.

All and all, it was a fun weekend!


Pin It!

Monday, April 16, 2012

Our 2nd year Birthday Bash is in full swing over at www.bostonscrapfanatics.com.  One of our challenges is to use this photo for inspiration for either a layout, card or ATC.  Give it a try and come post your finished project at the gallery.  Click on the link at the top of this page for a shortcut to the gallery.

I hope you'll play along.  Have fun!


Pin It!

Friday, April 13, 2012

Our Two Year Birthday Bash starts tonight at 6pm EST.  Come join us and meet Stella!
www.bostonscrapfanatics.com

Pin It!

Wednesday, April 11, 2012

Ahhhhh a day off and it promises to be an awesome day!  First on the agenda is a cut and color, then scrappin' the remainder of the day with my good friend, Tina.  Then it's off to dinner with a childhood friend.  Sounds like a great day, no?  I am so looking forward to all that today offers!

I haven't had much time at the scrap table lately, but I did manage to get two layouts done.  One is for this week's Twisted Sketches and the other was just for fun.

Here's my layout for Twisted Sketches:


The twist this time was brads.  And mine are the tiny yellow stars that you can see above the photograph.
To see the sketch visit www.twistedsketches.org.  Lots of great sketches there for you to play with.  Feel free to join along with any of them.  If you do, be sure to post your layout on www.bostonscrapfanatics.com and list the sketch # it corresponds to.  I'll bring your layout over here and post it to share with everyone.  I truly do hope you'll join in on at least some of the sketches!

I did mention two layouts, right.  The other layout is me continuing to get some old pictures scrapped.  This one is of Robert's family.  If you look closely at the photo, you'll see a guy in the middle of all those women.  I do believe it was taken while Robert's dad was home on leave from the army!  I'm sure he's thinking "lucky me."


That's it for me today.  I'm off to that haircut and color I mentioned.  Have a wonderful day and remember to laugh!


Pin It!

Sunday, April 8, 2012

The meaning of Easter as it plays out in my life:

For those of us that are Christians, Easter offers hope.  Jesus rose from the dead offering hope to all that believe.  I'm not a religious person, but I am a spiritual person.  I don't worship in church, though I have in the past and find great comfort there.  I am of the belief that my God is everywhere and I don't necessarily need to be inside a building to praise him.

Today's reminder for me was clearly portrayed on the morning news.  A man suffered an accident and a severe spinal cord injury.  He was in a coma for a while.  His girlfriend stayed by his side to support him.  THREE years after his accident they got married.  He was in a wheelchair, unable to walk or turn his head from side to side.  Needless to say dancing with his bride was out of the question.

FIVE years after his accident, his now wife heard of a machine being used in treatment for spinal cord rehab.  They travelled to Louisville, Kentucky.  The machine is called LOCO MAT.  The man entered physical therapy at this institution and after three months was able to stand on his feet, by himself, for the first time in FIVE years.   Shortly after, his wife attended a physical therapy session with him and was surprised when their wedding song played in the background and her husband asked her to dance.  Not a boogy oogy type of dance but rather a slow swaying in place.

Those of you that know me, know of my story with Eligio.  This is EXACTLY why I will never give up on his recovery.  I don't care what the odds are, nor do I care what the general consensus is.  I learned a very long time ago from a very wise man that as long as there is breath there is hope.

For me, this is the true meaning of Easter.

Oh, and by the way, how grateful am I that Spaulding Boston, where Eligio does his therapy, has the LOCO MAT and that's exactly how Eligio learned to walk again.

Thank you God.

Happy Easter to each and everyone of you.  And my wish is that you never, ever give up hope


Pin It!

Friday, April 6, 2012

Good Morning!  Can you believe it's Easter already?  Where did the winter go?  Oh!  That's right, we didn't have a winter here in the Boston area!  I think that's what makes it hard to believe it's Easter already.  The usual weather pattern that forces you to acknowledge the changing of the seasons has been missing.  And, although I missed the snow,  I am fully ready to embrace Spring and Summer now.

My pansies from last year are in full bloom in my window boxes and I have a beautiful show of color.  What makes that even better is that the cool temps from now until June will keep them blooming continuously until the hot summer sun!   My hyacinths are also up and oh so fragrant.  I just love the smell of hyacinths and Easter lilies this time of year!  In fact, my house will be full of delicious floral scents for Easter.  Gotta love that!  I also noticed yesterday that the 300 Scilla bulbs along the side of my house are up, and many of them are in bloom, as well as my Magnolia Tree and my Weeping Cherry Tree.   All so pretty.  I'm just hoping that we don't have a surprise snow storm because that would definitely kill off the blooms!

Oh, and I wanted to share with you all something I found on the Plaid website.  I get lots of questions about Mod Podge and how to apply it for the best end result.  I found this article helpful and hope you do too.

Essential Mod Podge Techniques (as found on the Plaid website):
Prepare your surface. Almost any surface can be used to create a decoupage project. Suitable surfaces include wood, paper mache, terra cotta, tin, cardboard, glass and craft foam. Only SOME plastics are suitable for decoupage – we recommend testing a small area before completing your entire project to make sure that the Mod Podge will adhere.
Base-coat your surface (optional step). Many items need to be base-coated before decoupaging if your surface is unfinished. We recommend FolkArt or Apple Barrel Acrylic Paints for base-coating.
Prepare Items to be Mod Podged. Here a few tips you should know before beginning.
  • Fabric – Wash and dry the fabric (do not use fabric softener). Iron and then lay out on a covered work surface.
  • Wax paper is preferable for covering your table. Using a brush, paint a light coat of Fabric Mod Podge onto your fabric.


Allow to dry. This will allow you to cut the fabric like paper without frayed edges.


  • Paper – Most items, especially thicker papers, are ready to be Mod Podged as is. If you are working with thinner sheets of scrapbook paper, it may help to spray your paper with a clear acrylic sealer before Mod Podging. Spray both sides and allow to dry before using.
  • Tissue Paper – There is nothing that you need to do to prepare tissue paper, but just be advised that because it is so thin, it is very difficult to Mod Podge without wrinkles. The good news is that wrinkles are typically part of the charm of using tissue paper and add a little character to your surface. Mod Podge tissue paper carefully so that it doesn’t tear. Cut out your paper or whatever it is that you are planning to decoupage. Experiment with design elements to determine the layout of your piece. Add interest to your design by using large and small pieces, layering and overlapping elements and coordinating colors.


Adhere each element with the Mod Podge finish of your choice. Always start with the underlying design elements and work your way upward. Apply a medium coat of Mod Podge to the surface. Too little Mod Podge and you will get wrinkles – you can always wipe away excess Mod Podge. Place your item(s) to be decoupaged on top of the Mod Podge and smooth thoroughly.


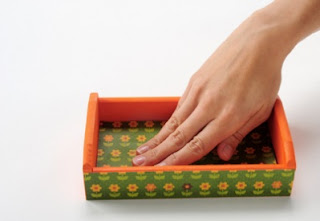
Keep smoothing until all of the bubbles are removed.


When working with large pieces, smooth from the center outward. Air bubbles can be removed with the Mod Podge Tool Set. Use the squeegee with smaller items such as trays – it was developed specifically for getting into corners.


Use a brayer for larger items such as furniture.


Add a protective coat of Mod Podge to your project using a sponge or flat brush. Allow to dry and then repeat. The number of coats you finish with is up to you, but we recommend at least two.


For a very smooth finish, wet a piece of #400 grit sandpaper with water and sand lightly between coats. Wipe dry and polish with #0000 steel wool on the final coat.


Hopefully, this quick photo tut will help demystify the process for you! 


Happy Easter!

Pin It!

Sunday, April 1, 2012

I just love gardening.  I especially love my flower garden.  I am on a mission to get the photos I've taken over the years onto layouts and into a scrapbook devoted to my gardens, both here and at the NH house.

This is the first of those layouts.  Isn't that rose gorgeous?  It's a Peace Rose.  Unfortunately, I've had to remove the rose bush as it had an invincible case of blight.  There's just no getting rid of that once it starts.  My bush would have a gorgeous, traffic-stopping show in late Spring and should have had successive blooms throughout the summer, but the blight caused the foliage to turn yellow and drop off.  It was a sorry state of affairs, I tell you.  Finally, after several years of trying to fight the blight, I decided to just remove the bush.  This was a difficult decision, but when my daughter bought me a gorgeous rose bush one year for mother's day, and it was planted in the same bed as the Peace Rose, and also fell hostage to the blight, I knew it was a decision that had to be made.  It's been two years and I still miss that Peace Rose!


Pin It!