Good Morning! Can you believe it's Easter already? Where did the winter go? Oh! That's right, we didn't have a winter here in the Boston area! I think that's what makes it hard to believe it's Easter already. The usual weather pattern that forces you to acknowledge the changing of the seasons has been missing. And, although I missed the snow, I am fully ready to embrace Spring and Summer now.
My pansies from last year are in full bloom in my window boxes and I have a beautiful show of color. What makes that even better is that the cool temps from now until June will keep them blooming continuously until the hot summer sun! My hyacinths are also up and oh so fragrant. I just love the smell of hyacinths and Easter lilies this time of year! In fact, my house will be full of delicious floral scents for Easter. Gotta love that! I also noticed yesterday that the 300 Scilla bulbs along the side of my house are up, and many of them are in bloom, as well as my Magnolia Tree and my Weeping Cherry Tree. All so pretty. I'm just hoping that we don't have a surprise snow storm because that would definitely kill off the blooms!
Oh, and I wanted to share with you all something I found on the Plaid website. I get lots of questions about Mod Podge and how to apply it for the best end result. I found this article helpful and hope you do too.
Essential Mod Podge Techniques (as found on the Plaid website):


Allow to dry. This will allow you to cut the fabric like paper without frayed edges.


Adhere each element with the Mod Podge finish of your choice. Always start with the underlying design elements and work your way upward. Apply a medium coat of Mod Podge to the surface. Too little Mod Podge and you will get wrinkles – you can always wipe away excess Mod Podge. Place your item(s) to be decoupaged on top of the Mod Podge and smooth thoroughly.

Keep smoothing until all of the bubbles are removed.
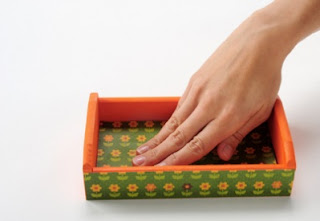
When working with large pieces, smooth from the center outward. Air bubbles can be removed with the Mod Podge Tool Set. Use the squeegee with smaller items such as trays – it was developed specifically for getting into corners.

Use a brayer for larger items such as furniture.

Add a protective coat of Mod Podge to your project using a sponge or flat brush. Allow to dry and then repeat. The number of coats you finish with is up to you, but we recommend at least two.

For a very smooth finish, wet a piece of #400 grit sandpaper with water and sand lightly between coats. Wipe dry and polish with #0000 steel wool on the final coat.

Hopefully, this quick photo tut will help demystify the process for you!
Happy Easter!
My pansies from last year are in full bloom in my window boxes and I have a beautiful show of color. What makes that even better is that the cool temps from now until June will keep them blooming continuously until the hot summer sun! My hyacinths are also up and oh so fragrant. I just love the smell of hyacinths and Easter lilies this time of year! In fact, my house will be full of delicious floral scents for Easter. Gotta love that! I also noticed yesterday that the 300 Scilla bulbs along the side of my house are up, and many of them are in bloom, as well as my Magnolia Tree and my Weeping Cherry Tree. All so pretty. I'm just hoping that we don't have a surprise snow storm because that would definitely kill off the blooms!
Oh, and I wanted to share with you all something I found on the Plaid website. I get lots of questions about Mod Podge and how to apply it for the best end result. I found this article helpful and hope you do too.
Essential Mod Podge Techniques (as found on the Plaid website):
Prepare your surface. Almost any surface can be used to create a decoupage project. Suitable surfaces include wood, paper mache, terra cotta, tin, cardboard, glass and craft foam. Only SOME plastics are suitable for decoupage – we recommend testing a small area before completing your entire project to make sure that the Mod Podge will adhere.

Base-coat your surface (optional step). Many items need to be base-coated before decoupaging if your surface is unfinished. We recommend FolkArt or Apple Barrel Acrylic Paints for base-coating.
Prepare Items to be Mod Podged. Here a few tips you should know before beginning.
- Fabric – Wash and dry the fabric (do not use fabric softener). Iron and then lay out on a covered work surface.
- Wax paper is preferable for covering your table. Using a brush, paint a light coat of Fabric Mod Podge onto your fabric.

Allow to dry. This will allow you to cut the fabric like paper without frayed edges.

- Paper – Most items, especially thicker papers, are ready to be Mod Podged as is. If you are working with thinner sheets of scrapbook paper, it may help to spray your paper with a clear acrylic sealer before Mod Podging. Spray both sides and allow to dry before using.
- Tissue Paper – There is nothing that you need to do to prepare tissue paper, but just be advised that because it is so thin, it is very difficult to Mod Podge without wrinkles. The good news is that wrinkles are typically part of the charm of using tissue paper and add a little character to your surface. Mod Podge tissue paper carefully so that it doesn’t tear. Cut out your paper or whatever it is that you are planning to decoupage. Experiment with design elements to determine the layout of your piece. Add interest to your design by using large and small pieces, layering and overlapping elements and coordinating colors.

Adhere each element with the Mod Podge finish of your choice. Always start with the underlying design elements and work your way upward. Apply a medium coat of Mod Podge to the surface. Too little Mod Podge and you will get wrinkles – you can always wipe away excess Mod Podge. Place your item(s) to be decoupaged on top of the Mod Podge and smooth thoroughly.

Keep smoothing until all of the bubbles are removed.

When working with large pieces, smooth from the center outward. Air bubbles can be removed with the Mod Podge Tool Set. Use the squeegee with smaller items such as trays – it was developed specifically for getting into corners.

Use a brayer for larger items such as furniture.

Add a protective coat of Mod Podge to your project using a sponge or flat brush. Allow to dry and then repeat. The number of coats you finish with is up to you, but we recommend at least two.

For a very smooth finish, wet a piece of #400 grit sandpaper with water and sand lightly between coats. Wipe dry and polish with #0000 steel wool on the final coat.

Hopefully, this quick photo tut will help demystify the process for you!
Happy Easter!

Thanks for the hints...now to find acrylic spray
ReplyDelete